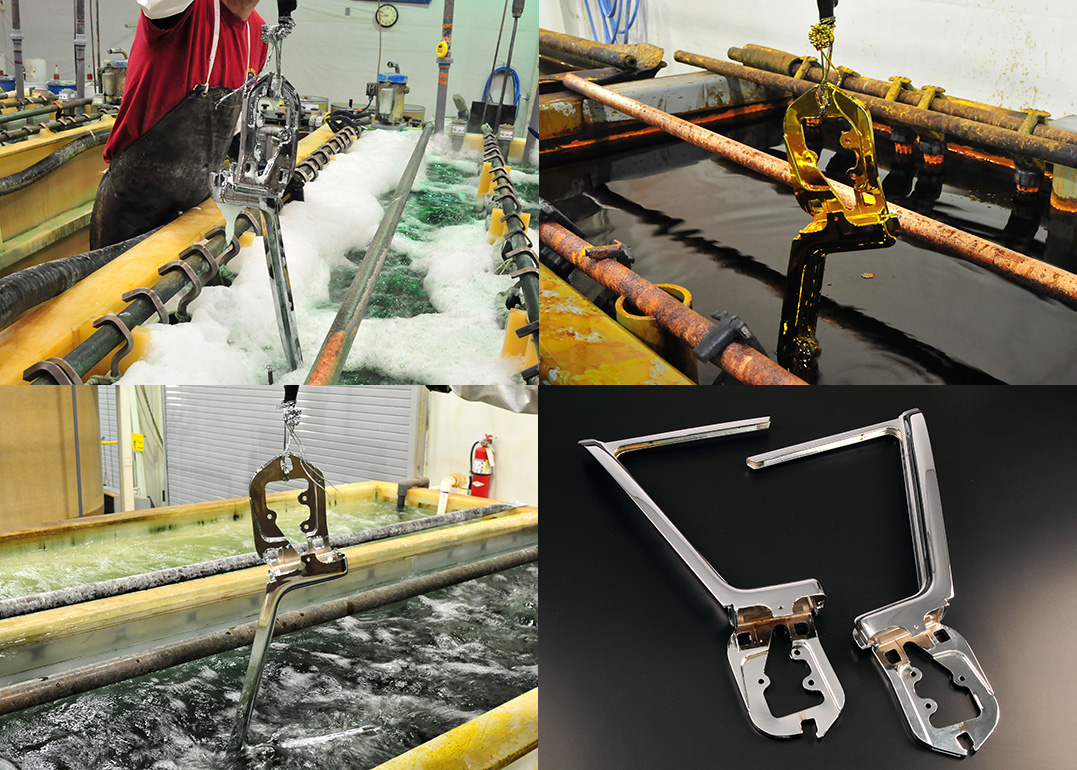
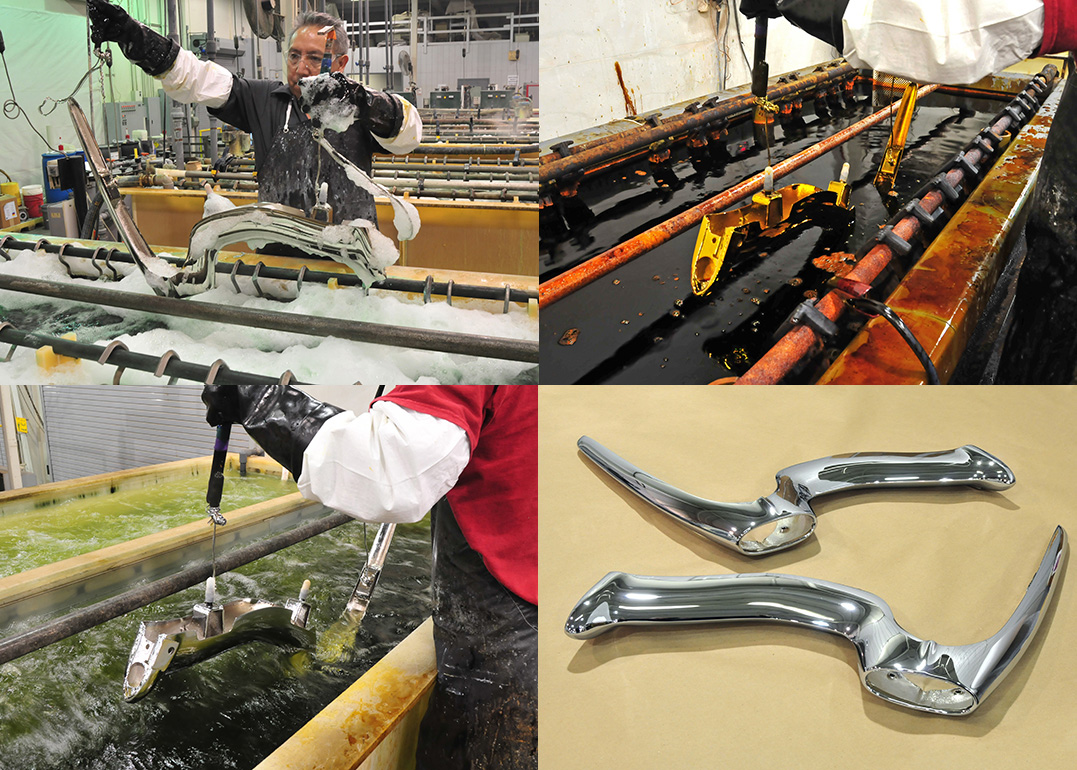
57 Olds Vent Window Post
An original pair of 1957 Oldsmobile vent window post ready to begin processing. The posts are racked up with copper wire and lowered into the sulfuric acid tank. After a period of time has passed, the posts are removed stripped down to original copper. Once electro-stripping is complete, all surfaces of the parts are glass bead blasted.

A heavy grit disc is used to go over the surface to remove waves, old copper, and dead metal. An angle grinder is used to slide over the smaller more intricate surface areas. The polisher created a pinwheel style disc, which is used to sand in the corners of the part. Now that the grinding is complete, hard block sanding is performed to level out the surfaces.

With block sanding complete, a finer grit on a DA is used to create a consistent surface finish. The vent posts are now metal prepped and ready for initial plating. Before plating, the parts are racked using copper wire to suspend the part in the plating tank. After the parts were racked, they were copper plated and returned to the polisher.

Luckily, the pot metal sealed up and no blistering is present, so the posts are DA’d for polishing. In preparation for polishing, a cartridge roll is used to sand in corners and intricate areas. Compound and a high-speed buffing wheel is used to polish the copper out to a mirror finish. Polishing out to a mirror lets the polisher fully inspect the part prior to final plating.

The posts are placed in the nickel tank for a set amount of time and inspected when removed. Since the nickel passed visual inspection, the parts are now ready for chrome plating. Once chroming is completed, the part is thoroughly rinsed and ready for quality control. The parts are free of flaws and ready for the customer to install on their car.
57 Cadillac El Dorado Rear Bumper Ends
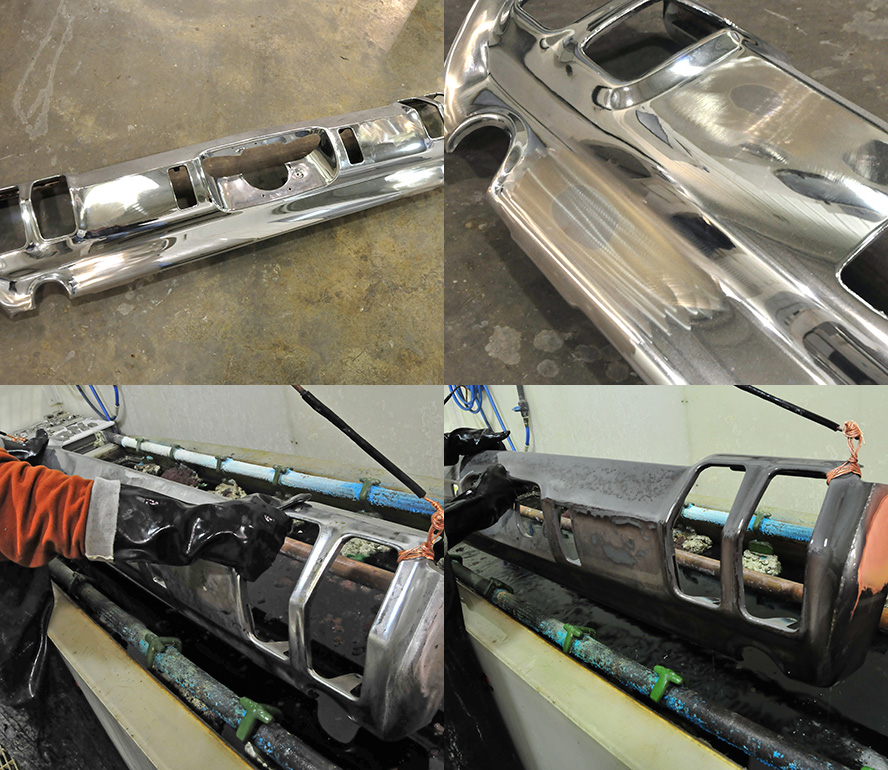
Here is a deteriorated set of cast aluminum rear bumpers for a 1957 Cadillac El Dorado. A closer look shows how corroded the aluminum is and how much material is missing. After the bumpers were electro-stripped, they revealed even more deterioration. The polisher begins by using a grinder to see how much of the erosion can be removed.

An angle grinder is used to sand smaller surfaces, being careful not to create waves or ruts. Initial grinding leaves the surface rough, so a finer grit is used on a DA to smooth out the surface. At this point, the bumpers have been sanded down as far as possible, but erosion remains. All areas of deterioration are marked and the bumpers are sent out for aluminum welding.

Repair is not limited to the face, the brackets and threaded holes need repaired on the backside. Returned from the welder, you can see there is a lot of sanding and shaping to do now. The polisher starts out by shaping the inner diameter of the exhaust ports. Next, he sands the leading edge to create a flat and level front lip surrounding the port.

Sanding and shaping reveal the correct shape of the bumper, prior to years of decay. Where the edges were welded and ground, a hard block is used to sand the surface smooth. Now that all sanding and shaping is completed, a DA is used to smooth out the surface. Both ends have been DA finished and are ready for their first trip through the plating process.

Being aluminum, the bumpers are first placed in an acid etch solution to prepare the surface. The bumpers are next lowered into a solution called Bondall, which is an adhesion promotor. After the Bondall, the bumpers are lowered into the cyanide copper tank. Once the bumpers have sealed up in cyanide copper, they are jumped to the nickel tank.

Next, the bumpers were removed from the nickel tank and returned to the polisher. At this point, the polisher simply DA sanded them and buffed them to a sisal finish for acid copper plating. Now that the bumpers have been acid copper plated, they are DA sanded. If the polisher sands through to nickel, he knows to stop sanding to avoid cutting through to raw aluminum. The DA sanded bumper end reveals a few small imperfections remain.
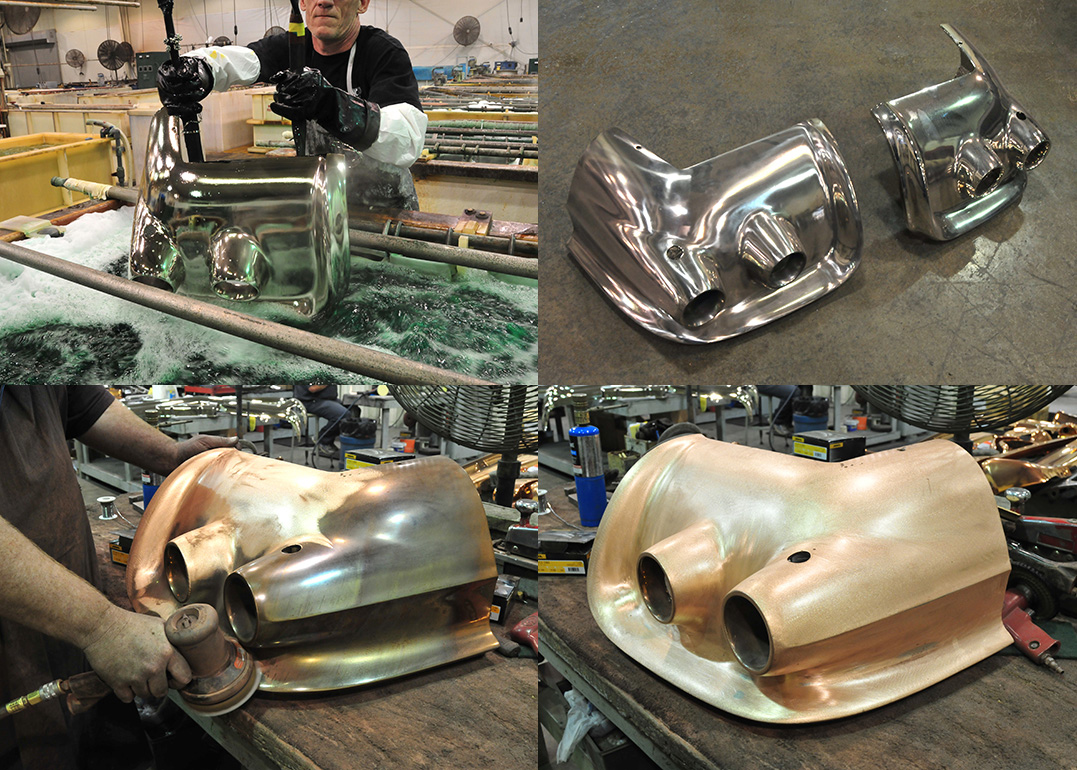
The remaining imperfections are addressed by solder filling the spots. It looks much worse than it is, but this is how it looks after all spots have been solder filled. All surfaces are now smooth and free of imperfections, so the bumper is DA sanded for polishing.

Tight spaces are polished first using compound and a buffing wheel on a hand held grinder. The larger areas are then polished using the stand polisher, which spins much faster. Polished out to a mirror finish, the bumper is inspected and ready for final nickel chrome plating. The bumper ends have come a long way from where they started and will look stunning on the back of anyone’s ’57 Cadillac El Dorado.

1941 Buick Grille
Pot metal parts are difficult to process and this 1941 Buick grille is a big piece of pot metal. This grille actually still had paint on it, so the painted recesses are blasted prior to electro-stripping. After the paint was removed, the grille was electro-stripped in sulfuric acid. The grille is then returned to the baster to clean the surface after stripping.

Now that the grille was blasted, the halves are ready for a polisher to metal prep. Here you can not only see where the grille is broken, but also how much pitting is on the surface. In order to stabilize for initial polishing, the grille is cyanide copper plated to allow for repairing the broken grille support. Solder is used to reconnect the broken portion of the grille support.

Since this repair is just for stabilization at this point, it is left as is and will be redone later. The polisher starts by using a large grinder to sand out as much of the pitting as possible. After sanding all of the flat surfaces, a crack was discovered, which the polisher notches out for filling/repair. The majority of the initial sanding is complete, only intricate areas remain.

For sanding in tight nooks and crannies, as well as small surfaces, a cartridge roll is used. Before the parts can be plated, they are racked up using copper wire for suspension in the plating tank. The first trip through plating was for cyanide copper to seal up the pot metal, this also allows for solder repairs too. A grinder is used to smooth out the bulk of the solder repair and level out the area.

The repair is sanded smooth and the evidence of the crack is gone. Next the polisher redoes the repair to the broken support that was tacked in place for initial sanding. Using a cartridge roll, the polisher has blended in the repairs on the support eliminating any signs of prior damage. There is a center portion that the grille halves mate to, so the polisher makes sure that the repair still allows for proper alignment.

After the repairs were complete, the grille was processed for acid copper. The acid copper provides a slight level of build that is DA sanded to smooth out the surface. As you can see, between the sanding and plating, almost all of the pitting has been removed. Although the grille has sanded out fairly smooth, there is still the need for additional copper plating to cover bare spots.

The last trip through acid copper shows that the grille can be sanded out and polished for final plating. After DA sanding with a fine grit, the polisher uses compound and a stand polisher to polish the part to a mirror finish. The polished out surfaces allow for one last inspection to ensure the parts are ready for chrome. Prior to nickel plating, the part is cleaned in an alkaline bath to make sure the surfaces are free of any oils, grease, or compound.

Once the grille had spent the right amount of time in the nickel tank, it was removed for chrome plating. Since the grille passed a visual inspection after nickel plating, it is ready for chrome plating. Chrome plating is complete, so the grille is rinsed thoroughly and passed off to quality control. Looking better than ever, this grille will be a brilliant piece of jewelry for the front of someone’s 1941 Buick.

1929-31 Chevrolet Grille Shell
This original ’29-’31 Chevrolet grille shell has been stripped down to raw brass. Although brass is excellent for plating, it has a tendency to crack and split, which is visible here. A large grinding disc is used to slide over the entire face of the shell to expose low and high spots in the metal. The low spots are tapped out from the backside to help bring the spot up level with the face.

Unlike other metals, we are able to make repairs on the raw brass. Here the polisher solder repairs the cracks on the side of the grille shell. Once the repair is sanded down, the rest of the side is air filed to make sure the surface is flat and wave free. When initial metal finishing was completed, the grille shell was now ready for copper plating. The shell was racked up for plating and thoroughly cleaned in an alkaline bath to remove any contaminants present.

With the shell properly cleaned and activated, it is lowered in to the cyanide copper tank. In a matter of minutes the shell is sealed with a base of cyanide copper plating. Since the cyanide is a thin deposit, the shell is jumped to acid copper for a heavier deposit. The heavier deposit of acid copper allows the polisher to work out any additional waves or inconsistencies that may remain in the shell.

After the polisher air filed and hard blocked the shell, it was processed for more acid copper. The last trip through acid copper was all it needed to create a flawless surface, so the shell was DA sanded and buffed out to a mirror finish. The mirror finish reveals that the sides are flat, wave free, and dent free, so it is ready for nickel and chrome plating. As with every time the shell has been plated, it is racked with copper wire and weights so the shell will be properly suspended in the plating tank.

Technicians on the plating line wipe down the polished shell in a soapy alkaline cleaner to remove any impurities on the surface. Once the shell was cleaned, the plating line tech lowers it into the nickel tank for a set amount of time. After the right amount of time had passed, the shell was removed from the nickel and inspected. The hole for the emblem is plugged, to ensure chrome coverage around the area, and the shell is placed in the chrome tank.

In just a matter of a couple of minutes, the chrome plating is complete and the shell is removed. Just like magic, the chrome solution is rinsed off to reveal a brilliant new chrome finish. As the customer had hoped, the shell is now free of cracks and waves, and there is no evidence of the repair. This view allows you to see just how beautiful the top of the shell is too.

1941-46 Chevrolet Pickup Grille
This 1941-46 Chevrolet pickup grille is in decent original shape, but is dingy and dinged, making it a prime candidate for replating. Before the grille can be electro-stripped, the old paint on the backside is removed in methyl chloride. After the paint was removed, the upper grille was electro-stripped to raw steel. The same electro-stripping process was applied to the large lower section of the grille too.

The last step of stripping is glass bead blasting both portions of the grille on front and back. Now that the blasting is complete, a nice clean steel surface is ready for the polisher. The polisher starts by using a grinder to slide over the main faces of the grille to remove any pitting and inconsistencies in the metal. Next the surfaces are hard blocked by hand with a finer grit sand paper to make sure the surface is flat and free of imperfections.

As planned, the grinding and sanding revealed a couple of dents that will need removed. While holding a solid hard steel dolly against the face, the polisher hammers out the dents from the backside. Checking progress on the dent removal, the polisher hard blocks the surface to see if he has successfully removed them. After some sanding and pecking with a hammer, the polisher has removed the dents from the grille bar.

The small connector surfaces between the grille bars are hard to sand with the larger tools, so a cartridge roll is used to sand these areas. Once all the straightening and hand sanding was completed, a DA with finer grit sand paper is used on the entire surface. The polisher executes the same set of steps on the upper grille that were used on the lower portion, being careful to retain definition of lettering and detail lines. With all metal finishing completed, the grille is ready for its first trip through plating.

Both portions of the grille are racked using copper wire and weights for suspension in the plating tanks. Before the parts can be placed in the plating tanks, they are cleaned with an alkaline cleaner. As soon as cleaning was complete, the grille was placed in the acid copper tank for plating and removed after a set amount of time had passed. Using a fine grit sanding disc, the polisher sands the sides of the grille bars smooth.
The larger, easier to access faces of the grille are then DA sanded with a fine grit sand paper. The same process is applied to the upper portion and the polisher has made sure to retain definition of the lettering and detail lines. Now that all DA sanding is completed and no additional copper is required, the grille can be buffed for final plating. Starting with the upper portion, the polisher carefully buffs out the surfaces to a mirror finish.

On large items with openings, like this grille, it is easy to get the part caught in the buffing wheel. So extreme caution is used while buffing this part. The whole grille is buffed out to a mirror and ready for final nickel and chrome plating. Any part getting chrome must receive nickel plating first, so the grille is placed in the nickel tank for a set period of time. When enough time has passed and the plating has leveled out, the grille is removed from the nickel and visual inspected prior to chrome plating.

All the hard work has brought us to the final step of chrome plating the grille. The orange residue from the chrome solution is thoroughly rinsed off and the grille is ready for final inspection. The finished grille is a major upgrade from what the original appearance was, and will look great on the front of a classic Chevrolet pickup. Even after all the sanding and plating, you can still read Chevrolet and see the style lines clearly.

1958-1960 Corvette Rear Bumpers
Corvette bumpers are practically a permanent fixture in our shop. This is a pair of rear bumpers for a 1958-60 that are in need of restoration. Using copper wire to help carry the current, the bumpers are placed in the sulfuric acid for electro-stripping. Although electro-stripping will remove the chrome and nickel, it cannot fully remove the old copper. With electro-stripping completed, the bumpers are glass bead blasted on front and back.

The bumpers have been fully stripped and blasted, so they are now ready for a polisher to work on them. A coarse grit pad is used on a grinder to slide over the entire face of the bumper to remove any pitting or inconsistencies. The initial grind also reveals any dents or dings that need to be hammered out. The grinder is also used to redefine any peaks to make sure they do not become softened during plating.

Once the initial grinding was completed, the polisher hard block sands the surfaces. A more flexible block is used to hand sand the curves where a hard block will not work. In order to make sure the bumper is wave free, the polisher also air files the large surfaces. When these bumpers were manufactured, they were two parts welded together. Over time the seams have become visible and need removed.

Using a die grinder, a groove is cut along the seam, to allow for proper repair. After the groove was cut, solder is used to fill the groove and remove the cracking. The seam is now filled with solder and ready for metal finishing. An angle grinder is used to remove the bulk of the solder prior to final sanding.

Now that the polisher is satisfied with the surfaces, a DA with fine grit sandpaper is used to go over all visible surfaces. Not only did the sanding smooth out the surfaces, it has also removed the old copper plating too. These bumpers are now ready for initial plating. The bumpers were processed for acid copper plating and have been returned to the polisher. Additional hard block sanding is performed to make sure all of the inconsistencies are removed from the surfaces.
With hard block sanding completed, the polisher DA finishes the bumper and sends it to the plating line for additional copper plating to cover a couple of small bare spots from sanding. Final copper plating is completed and the bumpers are removed from the acid copper tank and returned to the polisher for finishing. Since no additional hard blocking is required, the bumper is sanded with a DA and prepared for buffing. The polisher will also sand the rear edges of the bumper too, to make sure they do not have too much growth and are not rough or jagged.

Using a buffing wheel that spins at a high rpm, the bumpers are buffed out to a mirror finish. If any issues were not addressed in metal finishing and sanding, this mirror finish will show it to the polisher. These bumpers however, are ready for final plating. An alkaline cleaner is now used to make sure the surfaces of the bumper are clean of any contaminates that would disrupt the plating. Now that the bumper is clean, it is lowered into the nickel tank for the required amount of time.

After a set period of time had passed, the bumpers were removed from the nickel. A quick visual inspection was given and the bumpers were then chrome plated. The bumpers were rinsed a number of times to make sure all chrome solution was removed. The pair of Corvette bumpers turned out great and look better than they did when new.
1955-57 Chevrolet Nomad Lift Gate Frame
There are a lot of reproduction parts for Tri-Five Chevrolets, but Nomad lift gates are not one of them. So, restoring an original is the only option. Being pot metal, the frame is electro-stripped in sulfuric acid. The electro-strip safely takes the frame down to raw pot metal without further degradation. With the electro-stripping completed, the frame is glass bead blasted front and back.

The stripped and blasted frame is clean and ready for the polisher to begin metal finishing. Starting off, the polisher block sands the surfaces to see if there are any low or high spots. Block sanding reveals a high spot that needs to be hammered down to help level out the surface. Once any areas needing straightened are completed, the polisher slides over the surfaces with a coarse grit grinder to minimize pits and waves.

During the sanding process, a small angle grinder is used to keep fine contours defined and visible. Because the frame has two sides and multiple steps, the grinder is used at various angles to pass over all surfaces. Cartridge rolls are also used on small intricate surfaces in order to retain their contour. After all preliminary sanding and grinding is completed, the surfaces are sanded with a DA.

Now that metal finishing is completed, the frame is racked up for plating. All threaded holes and non-threaded holes are plugged for protection to retain function. Being pot metal, it is run through cyanide copper first to seal up the surface. Cyanide copper does not have a lot of buildup, so this is great for sealing up the pot metal.

The main concern with pot metal is blistering and cyanide copper will show you if the metal is going to blister. The scotch-brite helps reveal any areas where this might be occurring. A pinwheel style scotch-brite is used to go over the smaller and confined surfaces. The cyanide copper also promotes adhesion for repairs. This pit can now be repaired with the cyanide copper base. Solder is used to fill the pitting that was unable to be removed with grinding and sanding.

After the repairs are made, all the solder repairs are sanded smooth and the frame is prepped for additional plating. With no blistering problems and the repairs made to the pits, the frame is ran acid copper. The heavier deposit of acid copper will allow the polisher to work out any minor imperfections or waves that may still be present. The frame is now hard block sanded one last time to make sure the surfaces are as desired.

Since everything blocked out as hoped and there are no cut through spots, the polisher DA’s the frame for polishing. Surfaces that the DA is not able to effectively sand are sanded by hand with fine grit sandpaper. Using a high speed buffing wheel and compound, the polisher buffs the frame to a mirror finish. Racked and ready, the frame is lowered into the nickel tank for plating prior to chrome.

Once enough time had passed, the frame was removed and visually inspected for any flaws. The frame passed a visual once over and is chrome plated, rinsed, and inspected by quality control. You can see that the frame turned out beautifully, which makes it hard to imagine that if there were a reproduction of this part, that it could look any better than this. A close up reveals how good of a job the polisher did ensuring that the peaks, edges, and contours were retained.

1970 Oldsmobile 442 Rear Bumper
Here we have a rear bumper for a 1970 Oldsmobile 442 that is ready for processing. This particular bumper has been modified, which makes it a little more difficult than usual to process. The bumper will now be lowered into the electro-strip, although it would have been best to have the bumper electro-stripped prior to modification. Electro-stripping strips every surface at the same rate, so areas where the bumper has been modified are slightly thinner than others.
All parts are glass bead blasted, front and back, after stripping. This includes large bumpers too. The bumper cleaned up nicely and the raw surface is ready for metal finishing. Our polisher begins by sliding over the bumper with a coarse grit grinder. This will help expose the highs and the lows, as well as, remove any minor pitting. After grinding, an air file is used to remove any waves or ripples that may be present.

The air file helps reveal areas that are low and need to be straightened. A hammer and dolly is used to knock out the low spots revealed from air filing. Constrained areas, where an air file will not fit, are sanded by hand using a hard block. Once all hand sanding and air filing is completed, the entire bumper is sanded with a DA.

Seen here with its mate, the bumper is metal finished and ready for initial plating. With repairs needing to be made to areas that were modified, the polisher has elected to have the bumper cyanide copper plated first. Hard block sanding by hand helps reveal any areas that will require soldering to aid in repair. As you can see on this area, sanding has revealed the area that needs filled.

A propane torch is used to place a layer of solder over the area. An angle grinder is used to remove the bulk of the solder to make hand sanding easier. Now that the bulk of the repair has been ground down, hard block sanding is used to level out the repair. After all the repairs are made, the entire bumper is DA sanded and processed for acid copper.

The acid copper shows us that after metal finishing and repairs, the bumper is looking really good. Even though the bumper was looking good, in order to make it look perfect, the polisher air files and hard blocks the surfaces again. A small angle grinder is used to cut back the plating on the edges of the bumper and remove any jagged spots. Once all air filing and block sanding was completed, the surfaces were DA sanded and the bumper was ready for its last trip through acid copper.

This time the acid copper reveals that the bumper has reached the level we wanted for it. Since the bumper turned out like the polisher had hoped, he DA sands the bumper and buffs it out on a high speed buffer to a mirror finish. Seen again with its front mate, the bumper is polished to a mirror and ready for final plating. Now that the bumper is racked and cleaned, it is placed in the nickel tank for the required amount of time.

The bumper is then removed from the nickel tank, visually inspected, and moved on to the chrome tank. In no time at all the bumper is lowered into the chrome tank and finally chrome plated. Plenty of rinsing is performed to make sure all the chrome solution is removed. Even with the modifications that were made to this bumper, the modifications are no longer visible after plating.

1936 Buick Grille
This 1936 Buick grille is entirely made of pot metal, which is low grade and does not age well. As you can guess, it needs a ton of work to bring it back to better than new condition. For starters, the grille is electro-stripped in sulfuric acid to remove the old plating. Only small traces of copper remains after electro-stripping to raw. The grille is now glass bead blasted on front and back to make sure the pot metal surface is clean and consistent.

A close up look reveals how pitted and deteriorated the grille has become with age. Just like with most parts, an initial grind is applied to all surfaces to remove the majority of the deterioration and pitting. During the initial grind, the polisher determined a few bars were bent. So a hammer is used to lightly tap them back into alignment. Being that pot metal can be brittle, a steel punch is wedge between the bars to help support them during straightening.

After straightening the bars, the grinder is used again to double check that they are all on the same plane. Next an angle grinder is used to get the sides of the grille bars that are not accessible with the large grinder. This customer wants all side of the bars polished, so the polisher uses an angle grinder from the backside to sand the opposing face of the grille bar. This grille happens to be split at the bottom, near the center, on the main outer band.

In order to pull the grille together and give the repair some strength, the polisher cuts a groove horizontally across the split. Once the groove is cut, a hole is drilled on each end of the groove. Now the polisher uses a piece of copper cable to pull the grille together. Once pulled together, the polisher hammers the cable into the groove so it has the proper shape. Before any solder repair can be made to the split, the grille is cyanide copper plated.

Not only will the cyanide copper base allow for solder repairs, it will also help seal up the pot metal. The polisher is now able to solder fill over the area that has been pulled together using copper cable. At this time, the polisher also reattaches some grille bars that broke loose from the top of the main trim band. The repairs are now DA sanded smooth to level out the surface.

Next the polisher uses a small file to sand the repair smooth in the confined space between the grille bars. Since the grille bars step down slightly from the main trim band, an angle grinder is used to sand the solder repair where the bars were reattached. After the repairs were completed, the grille was processed for acid copper a couple of times to level out the surfaces and to help fill any minor pitting. The polisher begins final sanding by using a pinwheel style sanding disc on the backside of the grille bars.

Once sanding is completed on the sides of the grille bars, the face is DA sanded with fine grit sandpaper. The polisher used a hand held buffing wheel to polish the sides of the grille bars, and then he used the high-speed polishing machine to buff out the face of the grille. Now that the grille was buffed out to a mirror finish, it was lowered into the nickel tank. Checking both the backside of the grille bars and the face, the plating technician determines that the grille is finished in nickel and ready for chrome plating.

The grille is now moved to the chrome plating tank with an auxiliary anode placed behind it, which helps ensure that the grille is fully chrome plated in between the bars. All of the chrome solution is thoroughly rinsed off of all surfaces of the grille. The hard work has all paid off and as you can see there is no sign that the bottom of the grille was ever broken. A top view of the grille also shows that it is undetectable that some of the grille bars were once broken. This grille will be the crown jewel for the front of a customer’s 1936 Buick.
